PRACTICAL ASPECTS OF PHOTOGRAPHY
Accurate Positioning of the Patient
The patient needs to sit at a comfortable distance from the fundus camera. The patient chair should be able to be moved up and down. A chair with no wheels should be used as the patient could be in danger of moving backwards during the photography session. Although the camera is on a fixed table, it should be able to be heightened and lowered. The patient can then fit their chin into the chin rest and their forehead against the forehead rest. On the supporting arm of the forehead cradle is a mark, which is used to line up the eye to the correct level. This is achieved by moving the chin rest up and down.
The following gives a step-by-step guide to position the patient, the eye and picture taking:
- Turn room lights down.
- Adjust the height of the camera to fit the patient. Ask the patient to put their chin on the chin rest and forehead against the forehead rest. Align the fundus camera in front of the right eye and move the camera via the joystick until the position of the objective lens of the fundus camera is about 1″ in front and centred on the pupil.
CANON CAMERA (CR5 AND CR6)
- Ask the patient to look straight ahead and concentrate on the internal fixation light. Sometimes the patient will not be able to see the target light. If this is the case, ask the patient to look at the external fixation target.
- Look at the viewing screen and move the joystick forward until the camera is aligned with the fundus by putting the largest circle around the iris and the pupil should then have the 3 pin lights within it.
- Once there is reasonable alignment then the button behind the joystick can be activated which adds a +lens and enables a view of the fundus.
- Alignment of the fundus now occurs by positioning the two bright dots at the 3 o’clock and 9 o’clock position. Moving back and forward to get them as sharp as possible. If the camera is too far away, a bright ring may be visible. Move the camera slowly forward until it disappears.
- Ensure that you are on the correct area of interest.
- If the pupil is too small, the circle will be larger than the pupil size. When this occurs, a dilating drop will be required in order to dilate the pupils. The procedure should then be repeated following dilation until this stage.
- When ready, press down on the shutter release button.
TOPCON CAMERA (TRC-NW6S)
- Ensure that the picture position is set in the centre, for example a ‘C’ should be in the centre of the grid, which is displayed in the lower left-hand area of the camera monitor. If the picture position is not correct, please refer to the handbook for instruction as to how to change the setting.
- The picture angle should be set at 45°.
- The illumination level will automatically set at level 3, which should be adequate for most patients. The illumination level is displayed at the lower right side of the camera monitor. If the illumination needs to be altered please refer to the handbook for instruction as to how to change the setting.
- Move the camera using a joystick to the centre of the patients’ eye and place the projected circle of illumination over the patients’ pupil.
- Slowly bring the camera closer to the patient and the retina l image will appear on the video monitor.
- Instruct the patient to look at the green light.
- Bring the camera closer to the patient until two bright spots become visible.
- Bring the two bright spots together.
- Operating the focusing knob, align the focusing split lines into one line on the video monitor.
- Press the trigger release on the joystick when ready to take the picture.
- The captured image should appear on the video monitor.
Camera Maintenance
It is important that the front element is regularly cleaned (once a week). Firstly, use a lens blower brush or ‘dust-off’ to remove surface dust. Then use a good quality lens tissue such as a ‘Volk’ lens cleaner. DO NOT be tempted to use alcohol wipes, as they will, in time, remove the outer coating of the lens. Use a gentle pressure, wipe in a circular motion beginning with the centre of the lens and spiralling to the outside. Unfold the towel, apply a new section to the element and repeat the motion. Do not ‘scrub’ the glass. The best way to keep the lens clean thereafter is to place a lens cap over the lens. The manufacturer should clean internal optical surfaces.
External surfaces that come into contact with patients should be disinfected both between each patient and at the end of the day. This can be done using an anti-bacterial agent such as an ‘Alcowipe’ or ‘Hibisol’.
STANDARD VIEW AND PHOTOGRAPHIC PROTOCOLS
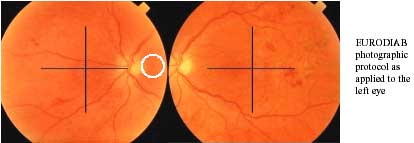
The Health Technology Board for Scotland advises that for screening purposes only one digital photograph needs to be taken of each eye. In particular, it recommends that the macular view of the EURODIAB protocol is used.
EURODIAB Protocol
The EURODIAB protocol is a two-field protocol that includes the macular view and an additional disc/nasal view.
Macular field: positioned such that the exact centre of the optic disc lies at the nasal end of the horizontal meridian of the field of view.
Disc/nasal field: positioned such that the optic disc is one disc-diameter in from the temporal edge of the field on the horizontal meridian.
- Disc/Nasal Field
This nasal view has been shown to confer no additional advantages when screening but may have a role for monitoring patients with more severe retinopathy whilst they are attend eye clinics.
For the nasal view, the two diagonal lights should be within the pupil margin. Once there is reasonable alignment then the button behind the joystick can be activated. This removes the anterior segment view. Alignment with the fundus now occurs by positioning the two bright dots equidistant within the view and moving back and forward to get them as sharp as possible. If the camera is too far away, a bright ring will be visible. If this happens, move the camera slowly forward until it disappears.
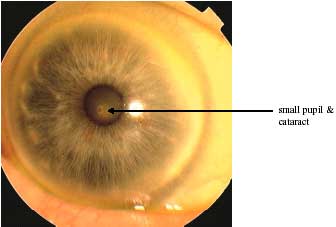
In general there are more technical failures with the nasal field of the EURODIAB protocol than the macula field. This reflects the need for a widely dilated pupil and the absence of peripheral cortical cataract to obtain a high quality nasal image. Both small pupils, as a result of autonomic neuropathy, and peripheral cortical cataract are more common in older people with diabetes. The NSC, which recommends this protocol, notes that because of this “the nasal view is regarded as a bonus rather than a necessity”.
- Disc/macular Field
For the Scottish Diabetic Retinopathy Grading System it will be important that the EURODIAB protocol for the macular field is modified to include the whole of the optic disc with a thin surrounding rim of retina. For this reason it would be more accurate to describe it as the Disc/macular field.
Summary
| preparation |
|
| patient contact |
|
| alignment |
|
Problems When Taking Photographs
CAMERA ARTEFACTS
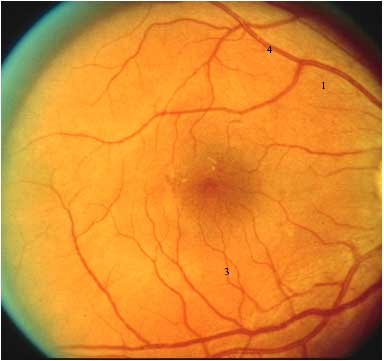
Ideally, the fundus photograph should be focused sharply, of deeply saturated colour, and evenly illuminated. Only the patient’s retina should be visible; anything else is an artefact. Several of the more common ones and their remedies are as follows:
|
Problem |
Cause |
Remedy |
| orange crescent | camera misaligned | move camera in opposite direction |
| blue peripheral haze | camera too far away from eye | move camera forward |
| bright blue-white central reflection | camera too close to eye | move camera backward |
| pale vertical tan or white streaks | eye lashes in the way | retract eyelid during photography |
| spots or streaks remaining in field regardless of subject position | tears, dust spots, or dirt on objective lens | clean lens |
| orange or red image with no detail | closed eye or blink synchronised with flash | retract eyelid |
PATIENT FACTORS
There may be patient factors that affect image quality such as the tear film, cornea, anterior chamber and vitreous.
Small Pupils
Maximum pupil dilation allows the entrance and exit of the fundus camera’s illumination and imaging light rays without interference. Older patients, especially those with diabetes, may have small, poorly dilating, pupils as a result of autonomic neuropathy. Dark irises also dilate poorly. This makes accurate focusing and alignment difficult. Decentring the fundus camera may result in better illumination.
Most non-mydriatic fundus cameras (not the Topcon range) have the extra versatility of a small pupil (SP) for images of a pupil with a diameter as small as 3.7 mm.
Photophobia or Droopy Eyelids
If the patient blinks frequently or has a droopy upper eye lid, photography may be impossible unless the photographer, or the patient holds the eye open. This is made easier if the patient is told to keep the other eye open at the same time. This prevents the patient from squeezing the eyelids together. Photophobia combined with holding open the eyelids may cause the eyes to weep, so frequent breaks are required to wipe and close the eyes.
Hard of Hearing
Patients may have to lip read in this situation. It is therefore extremely important that the procedure is fully explained to the patient face to face prior to positioning yourself behind the camera.
Poor Vision
The patient may not be able to see very much. To combat this, direct the patient for example asking the patient to look straight ahead.
TECHNICAL FAILURES
|
Image Quality Grade |
Description |
| 1 (best) | nerve fibre layer visible |
| 2 | nerve fibre level not visible |
| 3 | small vessels blurred |
| 4 | major arcade vessels just blurred |
| 5 (worst) | significant blurring of major arcade vessels in >1/3 of image in the absence of visible referable retinopathy |
Ungradeable images do occur, however, it is important to obtain an image of adequate quality for reliable grading. The HTBS have published a structured definition of image quality. This is as follows:
- A grade 4 image should still show referable retinopathy but may not show lesser severities of retinopathy.
- Image quality is paramount for accurate grading of retinopathy. The image quality grading structure has been adapted from the standard grading score for vitritis. The commonest causes of technical failure are small pupils and cataracts. Both small pupils (miosis) as a result of autonomic neuropathy and peripheral cortical cataract are more common in older people with diabetes.